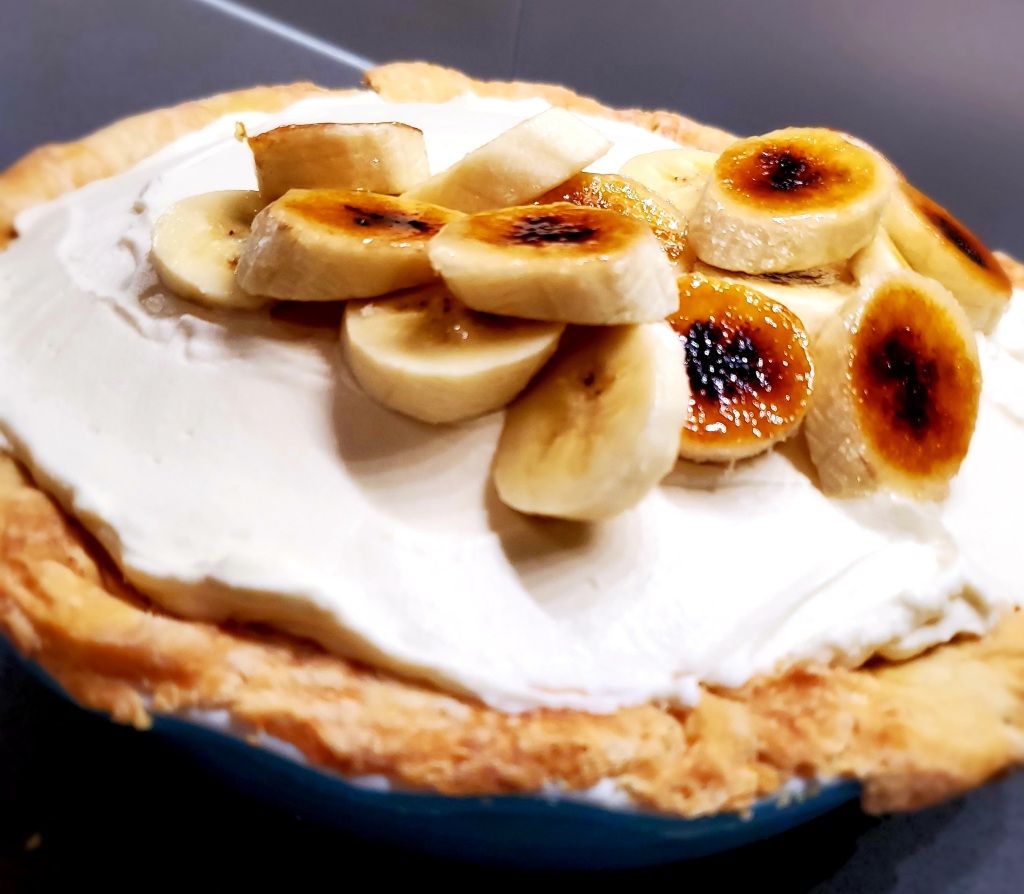
Banana Cream Pie
Easy Bakes, pies

Easy Banana Cream Pie

Banana Cream Pie
Banana Cream Pie

Do you know how incredibly easy it is to make your own vanilla pudding? I didn’t until a few weeks ago when I decided I had to make a banana cream pie. We were watching a show on Food Network when I got the inspiration to try another bake I knew nothing about. Vanilla pudding is the base for this creamy pie and once you see how easy it is to make, you’ll never buy store bought pudding again!

Below is the recipe for my quick and easy Banana Cream Pie. Keep scrolling for my Tips, Tricks, and Don’ts that I did.

Banana Cream Pie

Single Pie Crust Ingredients

  • 1¾ cups All-purpose Flour
  • ¼ tps Salt
  • ⅓ cup Unsalted Butter (Room Temperature)
  • 1½ tbsp White vinegar
  • 6 tbsp 2% Milk

Pie Filling Ingredients

  • 1¾ cups Whole Milk
  • ½ cup Heavy Cream
  • ½ cup Granulated Sugar
  • ⅛ tsp Salt
  • 4 Large Egg Yolks
  • ¼ cup Cornstarch
  • 2 tbsp Vanilla Extract
  • 2 tbsp Unsalted Butter (Room Temperature)
  • 4 bananas (Sliced)
  • Sprinkle of Ground Cinnamon (Optional)

Whipped Cream Ingredients

  • 1 cup Heavy Cream
  • 3 tbsp Powdered Sugar
  • 1 tbsp Vanilla Extract

Instructions for Crust

  1. In a small bowl combine the flour and salt. 

  2. Cut in butter with fork or dough blender until the mixture is crumbly. 

  3. Sprinkle mixture with vinegar. 

  4. Gradually add milk tossing with a fork until a ball is formed. 

  5. Cover with foil and refrigerate for 30 minutes until easy to handle.

  6. After the pie dough has chilled, preheat oven to 375°F.

  7. On a floured work surface, roll out the chilled dough.

  8. Turn the dough about a quarter turn after every few rolls until you have a circle 12 inches in diameter. 

  9. Carefully place the dough into a 9×2-inch pie dish. 

  10. Tuck it in with your fingers, making sure it is smooth. 

  11. Use a small paring knife to trim excess dough off the edges. 

  12. Chill the prepared pie shell for 30 minutes. You'll want it very cold before blind-baking.

Instructions for Blind-Baking the Crust

  1. Line the chilled pie shell with aluminum foil, making sure to cover the edges so they do not burn

  2. Fill with pie weights or dried rice, then bake until the pie crust is very lightly browned, about 25 minutes.

  3. Remove the foil (and weights) carefully and continue to bake the crust until it is a deeper brown, about 5 minutes more.

  4. Transfer the pie shell to a wire rack to cool completely as you prepare the filling.

Instructions for Pie Filling

  1. Combine the milk, heavy cream, sugar, and salt in a medium saucepan over medium heat. Whisk until all the sugar has dissolved, then bring to a gentle simmer, whisking occasionally. 

  2. Working quickly as the milk mixture begins to simmer, whisk the egg yolks and cornstarch together in a medium heatproof bowl until thick and smooth. 

  3. Very slowly stream in 1 cup (240ml) of the simmering milk to slightly warm the egg yolk mixture.

  4. In a very slow stream, whisk the egg yolk mixture into the pan. 

  5. While continuously whisking, cook until the mixture is thick (pudding consistency) about 1 minute. 

  6. Remove the pan from the heat and whisk in the vanilla extract and butter. 

  7. Place a piece of plastic wrap directly on top of the warm pudding to prevent a film from forming on top. Allow to cool for 15 minutes.

  8. Slice 2 bananas and arrange slices into the cooled pie shell. Sprinkle with cinnamon. Spread cooled filling on top. Place a piece of plastic wrap directly on top of the filling. Again, to prevent a film from forming. Refrigerate for at least 4-8 hours and up to 1 day.

Whipped Cream Instructions (when ready to serve)

  1. Using a hand mixer or a stand mixer fitted with a whisk attachment, beat the heavy cream, powdered sugar, and vanilla on medium-high speed until stiff peaks form, about 5 minutes.

  2. Spread or pipe onto the chilled pie. 

  3. Slice the 2 remaining bananas and decorate the pie with slices. 

  4. Slice and serve.

Dessert
Banana Cream Pie

Banana Cream Pie
Banana Cream Pie

Tips, Tricks and Don’ts That I Did

  • Don’t skimp on the fridge time. This recipe is all about chill, chill, chill, and more chill. Chill the dough and chill the filling. Very cold dough is essential in making a flaky delicious crust. 
  • Don’t let the homemade pudding (the filling) intimidate you. It’s so easy and comes together like magic. All you must do is follow the instructions.
  • Do play with crust and flavor options. This recipe is versatile. You can add vanilla wafers, blueberries, strawberries or even honey. The possibilities are endless.
  • I added a few bruleed bananas to the top of my pie for a little added flavor. You can too, here’s how https://www.youtube.com/watch?v=BI2HlJwAXJw
  • If you liked this recipe, check out my recipe for Easy Macarons here https://eats8.food.blog/easy-macarons/ (Pro Tip- you can use your egg whites from this recipe for your Macarons).
  • As always don’t forget to Enjoy!
Banana Cream Pie


Favorite Bakes, pies

Mini Peach Pies

Texas Peaches

My love for Texas runs deep and one of the things I love the most about Texas is the produce. Texas has the best of every fruit or vegetable you can imagine, but the real stars of all things produce are the peaches. The peaches here are incredibly delicious and can only be described as juicy and juicy. Peaches here are so juicy you have to eat them over your sink… literally. I’m ashamed to admit that I lived in Austin for a full 3 years before ever trying one. I still remember my first bite in my friend’s car and the unexpected delicious juice explosion that happened. I came home after and ate 4 more over my sink. If you live in Texas and haven’t had a Texas peach, do yourself a favor and stop at the next peach stand you see on the side of the road. Trust me. You’ll thank me later.

For this week’s bake and to celebrate the start of peach season in Texas I decided to bake a few mini peach pies. This past weekend we made a trip to our local farmers market and grabbed the best peaches they had to offer. Below is the recipe for my mini peach pies with a hint of nutmeg and brown sugar along with my tips, tricks, and don’ts that I did. Enjoy!

Mini Peach Pies

Ingredients and Directions for Pie Filling

4 cups of sliced peaches (about 5 medium peaches)

2 tablespoons of fresh lemon juice

1/4 cup all purpose flour

2/3 cup of brown sugar

1/4 teaspoon of salt

1 tablespoon of ground nutmeg

Combine all ingredients into a medium sized bowl and toss to cover peaches.

Ingredients for Double Crust

2 cups of all purpose flour

1/2 teaspoon of salt

2/3 cup of butter

1 tablespoon of white vinegar

5-6 tablespoons of 2% milk

1 egg white whisked plus 1 tablespoon of water

1 tablespoon granulated sugar

Directions for Pie Crust

In a medium bowl, combine the flour and salt.

Cut in shortening until mixture is crumbly.

Sprinkle with vinegar.

Gradually add milk, tossing with a fork until a ball is formed.

Cover with plastic wrap and refrigerate for 30 minutes or until easy to handle.

Putting it all together

Divide dough into 2 portions, 1 slightly larger than the other.

Roll out larger ball on a lightly floured surface to fit 4 small pie pans.

Add Peach Pie filling to uncooked pie shells. (about 1 cup per mini pie pan)

Roll out remaining pastry to fit tops, trim and flute edges.

Cut slits in tops for venting.

Mix the egg white and water in a small bowl and brush over the pies.

Sprinkle with granulated sugar.

Bake at 400 degrees for 25 minutes, then reduce heat to 350 degrees and continue cooking for an additional 30-40 minutes or until tops are golden brown.

Mini Peach Pie

Tips and Tricks and Don’ts that I did

To peel or not to peel… lots of peach pie recipes say to peel the peach skin. I left mine on because I love every single part of the peach. Feel free to peel if you’d prefer.

I used a mix bag of super ripe to barely ripe peaches for this recipe. It took a lot of self control not to devour the super ripe peaches over my sink, but it was worth it for the pies. Pick whatever peaches you think are best. If you choose all barely ripe peaches you may need to bake your pies a tad longer.

The pie crust recipe can be used for a full pie instead of 4 minis. If you make the full pie you’ll need about 2 additional cups of peaches.

If you don’t like the taste of nutmeg, feel free to substitute with cinnamon.

Go ahead and wrap your edges with foil before you start baking the pies. Usually I wrap pie edges mid-bake, but for these lil guys you’ll get an even bake without any burnt edges if you foil wrap pre-bake.

Don’t over bake your pies. Once the pies are golden and the peach juice starts to bubble it’s time to take them out.

Don’t be sad if the pies aren’t perfect. I was a little dissapointed when my pretty pies ended up with peach juice all over them, but the peach juice is delicious and adds a little peach flavor to the crusts.

These pies don’t have a ton of added sugar which makes them fairly healthy so don’t feel guilty if you eat an entire mini pie… or two.

You can sub regular flour for a gluten free blend if you want a gf crust.

These pies are delicious by themselves or you can whip up some homemade whipped cream or vanilla ice cream to go with them.

Don’t forget to Enjoy!

Mini Peach Pie with Whipped Topping


Favorite Bakes, pies

Easy Low Sugar Apple Pie

This week’s bake is the bake that made me fall in love with baking. Before this pie the only pie I knew anything about was the kind you buy from the grocery store. Then one day my kids school asked for volunteers to bake pies for their teachers for the holidays and for whatever reason I decided right then I could bake not just one pie but 3 delicious apple pies…. from scratch. After a few days of research, recipe recommendations and one temper tantrum (basically I had a moment where the idea of baking a crust scared the crap out of me and I had to be talked down from that ledge) the pie recipe below was born.

I’ve also included a few tips and tricks and my don’ts that I did at the bottom of the recipe. Enjoy!

Ingredients for Double Crust

2 cups of all purpose flour

1/2 teaspoon of salt

2/3 cup of butter

1 tablespoon of white vinegar

5-6 tablespoons of 2% milk

1 egg white whisked plus 1 tablespoon of water

1 tablespoon granulated sugar

Ingredients for Apple Pie Filling

5 cups of thinly sliced apples (about 10 large apples)

3 tablespoons of sugar

3 teaspoons of cinnamon

1/4 teaspoon of salt

Directions for Pie Crust

In a small bowl, combine the flour and salt.

Cut in shortening until mixture is crumbly.

Sprinkle with vinegar.

Gradually add milk, tossing with a fork until a ball is formed.

Cover with plastic wrap and refrigerate for 30 minutes or until easy to handle.

Directions for Apple Pie Filling

Peel and thinly slice your apples.

In a medium bowl combine sliced apples, sugar, flour, cinnamon and salt.

Toss gently to combine well.

Putting it all together

Divide dough into 2 portions, 1 slightly larger than the other.

Roll out larger ball on a lightly floured surface to fit 9 or 10 inch pie plate.

Add Apple Pie filling to uncooked pie shell.

Roll out remaining pastry to fit top, trim and flute edges.

Cut slits in top for venting.

Mix the egg white and water in a small bowl and brush over the pie.

Sprinkle with granulated sugar.

Bake at 450 degrees for 15 minutes, then reduce heat to 400 degrees and continue cooking for an additional 30-40 minutes or until top is golden brown.

Tips and Trick and Don’ts that I did

For the apples I used half granny smith and half fuji, but you can use any type you’d like. I liked the tangy sweet combo of those two together, but there are so many kinds of apples you can mix and match several different combinations.

I used a potato peeler to peel my apples, it works perfectly.

When adding the apple filling, be sure to layer your apples and not just dump them in the shell. It helps to evenly bake your apples. I’ve included a picture below to show you how I layered.

Don’t be afraid to foil your edges when baking your pie. It’s kind of a pain, but worth it. I burned the edges a little on my first one because I wasn’t sure exactly how to foil and was too afraid to try. I found that cutting four strips of foil and doing it in sections worked best for me. Be careful not to burn yourself and make sure to foil before they get too brown (about half way through the bake).

My recipe has an extra teaspoon of cinnamon, but if you’d like a sweeter pie you can add just 2 teaspoons instead of 3.

I had no idea what “cut in the shortening” meant when I started baking. It just means to add cold butter to your dough. I found that the best way to do this is with a fork and your hands. Be careful not to handle the dough too much. The key to a flaky crust is cold butter.

I also had no idea how to make slits in a pie. The purpose is to allow the steam in the pie to be released during the baking process. The slits are basically vents. Start with a circle in the middle and then add slits however you’d like. Have fun with it. I added some dough leaves to my pies but there’s a million things you can do. Don’t be afraid to be creative!

Don’t throw a temper tantrum if this recipe seems hard. Trust me, if I can do it anyone can do it. And if you mess up, try again. My first pie was far from perfect, but the second and third turned out pretty great. Baking is like everything else, the more you do it, the better you get.

Most importantly, don’t forget to enjoy!

Favorite Bakes, pies

Simple Mousse Recipe

For Christmas this year I gifted myself a new mixer and thought making a mousse would be a perfect way to test it out. So for my first bake and blog of the New Year I made one of my favorites, a Chocolate Mousse Pie.

This was the first time I did a blind bake with my crust too so I wanted to make sure I got the crust perfectly flaky and absolutely did not want a soggy bottom. This meant I needed to do my research and lots of it. I spent a few hours online reading various recipes and reviews about the perfect way to blind bake a pie crust. There is a ton of information out there about the best options, from pie weights to uncooked rice and beans and more in between. Ultimately I decided to go with sugar because I had sugar on hand and it had great reviews from fellow bakers.

Below is the recipe for the chocolate mousse, the crust, the blind bake and how to put it all together for a delicious light and fluffy New Year Treat. I’ve also included my tips and tricks and don’ts that I did at the end.

Ingredients for Single Pie Crust

1 cup all purpose flour

1/4 teaspoon salt

1/3 cup butter

1 and 1/2 tablespoons white vinegar

4 tablespoons 2% milk

Directions for Pie Crust

In a small bowl combine the flour and salt.

Cut in butter with fork until the mixture is crumbly.

Sprinkle mixture with vinegar.

Gradually add milk tossing with a fork until a ball is formed.

Cover with foil and refrigerate for 30 minutes until easy to handle.

Blind Baking Your Crust

Once the dough is chilled, roll out pastry on a lightly floured surface to fit 9 inch pie plate.

Crimp edges a little taller than the pie plate so there is less room to shrink.

Line crust with heavy duty aluminum foil.

Freeze crust for at least an hour.

Once the crust has had time to freeze, preheat oven to 350 degrees.

Fill pie to the top with granulated sugar.

Bake for 60-75 minutes.

Remove pie crust from oven.

Remove sugar and store sugar for later use.

Let crust cool and prepare mousse.

Ingredients for Mousse

4 cups heavy cream

6 tablespoons of sugar

12 ounces semi sweet chocolate chips

1 teaspoon vanilla extract

Directions for Mousse

With stand mixer beat 3 cups of heavy cream and sugar to stiff peaks (about 6-8 minutes) refrigerate until ready to use.

In a medium saucepan combine 1 cup of heavy cream, chocolate chips and vanilla.

Place over medium heat, stirring constantly to avoid burning the chocolate.

Once the chocolate has melted (about 2-3 minutes) remove from heat and let cool.

When chocolate has cooled, gently fold it into 2 thirds of the whipped cream until completely incorporated

Putting It All Together

Pour mousse into prepared crust.

Refrigerate for 8 hours or freeze for 4

Top with remaining whipped cream and serve.

Tips and Tricks and a Few Don’ts That I did

Don’t be afraid to get your hands dirty when making the crust. I found that in order to cut in the butter to the flour my hands worked better than the fork.

That being said be careful not to handle the dough too much. Overworking the dough will cause it to become tough and not tender and flaky. The key to a good pie crust is cold butter.

One mousse recipe I tried said to add salt to the semi sweet chocolate. Whatever you do, DO NOT add salt to semi sweet chocolate. That type of chocolate has a saltiness to it already and adding more salt made it inedible. It was AWFUL. I ended up throwing out the entire thing and starting over minus the salt. It turned much much better.

I’ve given this tip before, but it’s worth repeating. Do not stop stirring your chocolate. It melts and burns really fast. I use a rubber spatula to stir and scrape the bottom of the pan. It works great and so far I haven’t burned a batch of chocolate. **knock on wood**

A stand mixer is awesome to achieve quick peaks, but it isn’t necessary. I’ve made whipped cream with a hand mixer and it turned out just as great.

Freeze or refrigerate your pie, but make sure it’s served cold. I froze mine to share later this week. If you freeze it just be sure to take it out of the freezer at least 30 minutes prior to serving so the crust has time to thaw a little.

Enjoy and Have a Very Happy New Year!!!